Shooting Fireworks

Here are the 10 most asked question for shooting fireworks, and I am answering to all of them!
By Franc Peret

During my Essential Photography course, which duration is only 25 hours, I cannot cover every aspect of photography in detail.

Light and Colors
However, anytime, I am having specific question from a student, I do take the time to explain the in and out of any special use of the camera.

Nikon D750  = Manual Mode  =  ISO400 1/3s -0.3 EV with 35 mm f/1.4 @ f/5.6
Nikon D750 = Manual Mode = ISO400 1/3s -0.3 EV with 35 mm f/1.4 @ f/5.6
Panasonic GM5 = Manual Mode = ISO200 0.6 s + 25 mm f/1.4 @ f/2.5

One of the topic that often come to the discussion is firework. And it is easy to understand its attraction to photography students.

3 Good reasons to give it a try
First, for a person dedicated to light and colors, a firework show is just magnificent to watch.
Second, This is happening at night, when most of the time people do not take their camera out and this is a very special experience to try.
Third, this subject seems very challenging to shoot as the illumination, which is hard to anticipate, does not last long.
Overall, there is plenty of reasons to give it a try for a photographer, but how to make it a successful experience?
Here are the most often asked question, answered with my tips and the way I am dealing with this subject.
Panasonic GM5 = Manual Mode = ISO200 01/4s +0.3EV + 25 mm f/1.4 @ f/1.6
Panasonic GM5 = Manual Mode = ISO200 0.8 s - 0.3EV + 25 mm f/1.4 @ f/9
Panasonic GM5 = Manual Mode = ISO200 0.8 s – 0.3EV + 25 mm f/1.4 @ f/9

1 – Do I need a tripod?
Yes and no. Tripod can be useful if you are shooting the firework AND the environment (such as a enlighten city landscape). Then, it is important to keep the camera steady as you want to get the background sharp as well.
However, if the main source of light of the location is the firework itself, you can shoot handheld, even with a long pose, as the explosion behave like a flash and the environment is going to be light up only a very short fraction of second and not during your complete shutter time.

2 – Do I need to shoot in manual mode?
If you get a bright background, It is possible to shoot in semi-auto mode (Aperture priority) with some exposure compensation to force the image to get darker(such as -2 or so), however I personally use manual mode, playing around the Aperture and the shutter speed to grab all the color of the firework and to create some special effect with long pause.

Panasonic GM5 = Manual Mode = ISO200 0.6s + 25 mm f/1.4 @ f/7.1
Panasonic GM5 = Manual Mode = ISO200 1.3s + 25 mm f/1.4 @ f/9

3 – Do I need a fast lens?
You do not need a lens with a big Aperture (such as f/1.8 or so) as you are shooting a very bright source of light and by using a wide Aperture, you will take the risk to overexpose the image and therefore, you will get no colors to see. Most of the time, my lens is set to f/4 or f/8 which is a good news as any average zoom will get that Aperture.

4 – Do I need a fast Shutter speed?
All depends what you want to achieve, Get a very sharp view of the explosion or to give time to the fire and colors to spread around to fill up more of the sky. Best is to constantly play around with shutter speed from 1/30s to more than 3s.

Nikon D750 = Manual Mode = ISO200 1/5s -0.3 EV with 35 mm f/1.4 @ f/8

5 – Do I need to increase the ISO a lot?
Best is to keep the ISO low as raising it will bring more noise to the shot, especially in the dark part of the shot (the sky). Also, a higher ISO means less details, less dynamic range and less colors. I usually try to stay as low as ISO 200 or ISO 800.

6 – Do I need to be perfectly stable?
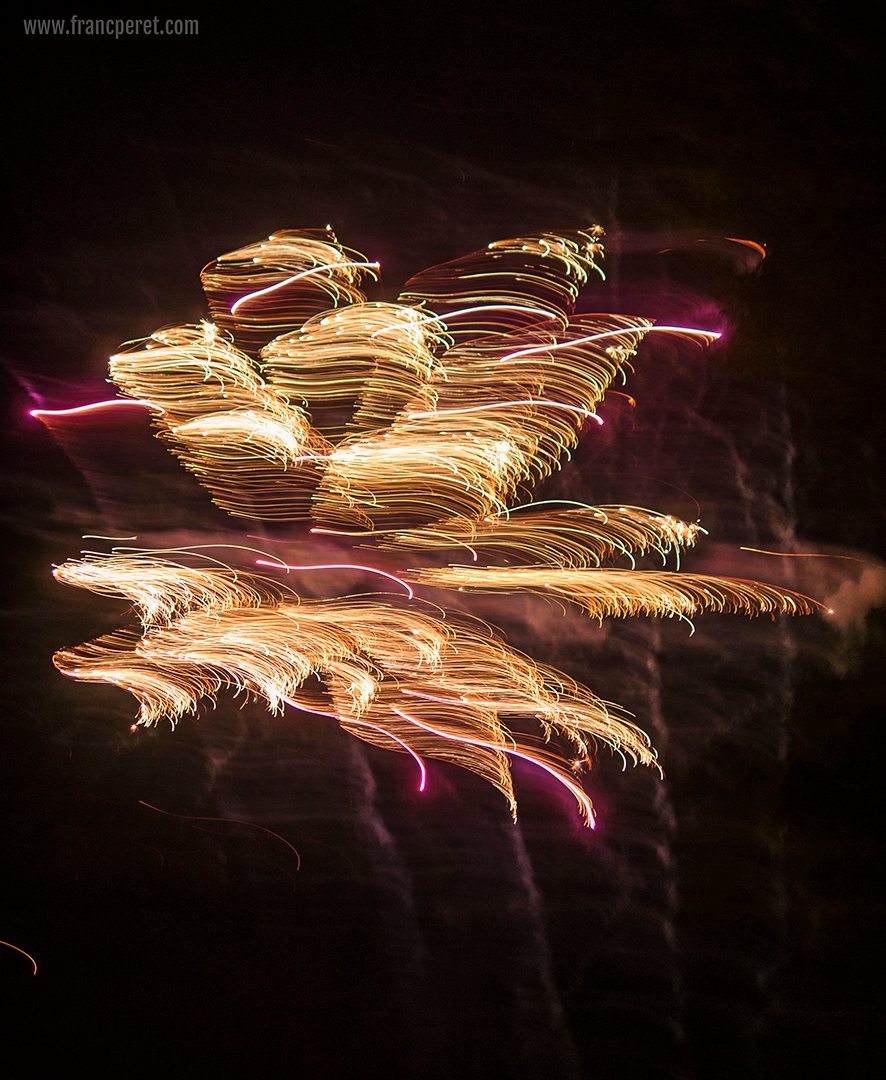
No, as firework is a very good subject to paint with light and by combining a long shutter pause with some camera shake, you can achieve very subliminal results.

Panasonic GM5 = Manual Mode = ISO200 1/5s + 25 mm f/1.4 @ f/1.6
Panasonic GM5 = Manual Mode = ISO200 1/4s + 25 mm f/1.4 @ f/1.6

7 – What lens should I use?
Best is to start with your usual zoom as one problem with firework is to know where exactly things are going to happen. By starting with the wide side of the zoom, you get more chance to grab the show and after you are more confident to guess where the following blow of light will occur, you can zoom in more and more to get some interesting close up.

8 – Should I use manual focus or auto-focus?
You cannot rely on your auto-focus if you point your camera straight to the sky as there is nothing to focus on.
Best, is to pick up something as near as possible to the explosion (such as a tree or a building) and to preset your focus there with auto-focus. You can lock this by half-pressing the shutter button while waiting for the explosion or you can switch your camera to manual mode.

Panasonic GM5 = Manual Mode = ISO200 1/2s + 25 mm f/1.4 @ f/2

If you do so, be very sure to NOT turn the focus ring after as your focus point will not be well preset anymore.
Some camera gets a back button you can use to force your camera to focus and lock it as soon as you stop to press this button. This feature can be useful here, as you need to preset your focus and keep it as is.

9 – When should I press the shutter button?
As often as possible, even you are seeing nothing coming yet. When the sound of the firework is coming to your hear or when your eyes are seeing the light, it is almost too late to shoot. You have to be ready, and listen to the starting explosion which is launching the rocket in the sky.
Also, by using a long pause (slow shutter speed), you get much more chance to grab something as your sensor is open to the show for a longer period of time.

Nikon D750 ISO200 1/5s -0.3 EV with 35 mm f/1.4 @ f/5.6

10 – Where should I position myself?
First try to be out of the crowd to not get pushed around. Second, find a higher position to not get other people head, hands or smartphone in your framing. Sometime, it is good to insert some viewers in the shot to give a sense of scale and to create an atmosphere, but for a first experiment, better to keep it simple…

I hope all of this was useful.
If you are having more questions or if you are in need of more explanation, drop me an email.

Former photo journalist, Film maker and ELC Shanghai Photography teacher, Franc Peret is teaching Essential Photography Classes, Advanced Photography Workshop and Film Making Classes in Shanghai, for the last 11 years.
If you wish to contact Franc, just drop an email to francperet@hotmail.com

The 3 Steps of Photography

I am used to divide my Essential Photography course in three steps. First, providing essential technical knowledge. Second, explaining essential composition rules. Last but not least, developing student’s conceptual mind. Here is how it works.
By Franc Peret

Taking successful pictures is both a simple task and a complicated one.
Simple, because the process involved is almost always the same and quit easy to explain and remember, step by step:
1 – Set the right exposure
2 – Focus on the subject.
3 – Be ready to grab the right moment (positioning or facial expression for example)
4 – Concentrate on your personal creative decision in term of framing, assembling elements (composition), and depth of field.

"Yammi"  (Lumix G85 ISO 100 1/100s + 14-140 mm f/3.5-5.6 @ 17 mm f/4.5) Being patient and steady while waiting for the right moment to shoot help to become discreet and out of focus of the subject, even you are next to her.
“Yammi” (Lumix G85 ISO 100 1/100s + 14-140 mm f/3.5-5.6 @ 17 mm f/4.5) Being patient and steady while waiting for the right moment to shoot help to become discreet and out of sight of the subject, even you are next to her.
Once the essential set up of the camera is done right, most important is to not miss the right moment! Lumix G85  ISO 400 1/40s  + 25mm f/1.4 @ f/1.4
“Ice on lips” (Lumix G85 ISO 400 1/40s + 25mm f/1.4 @ f/1.4) Once the essential set up of the camera is done right, most important is to not miss the moment!

Not that simple

The fact that you often have to solve those 4 steps in less than a second is the complicated part of photography.
Getting the picture right, as often as possible, is possible with training…
More you are going to shoot, better the chance to make the right decision on time.

"Reflective street"  (Lumix G85 ISO 100 1/80s -0.7 + 14-140 mm f/3.5-5.6 @ 14 mm f/8) Searching for interesting lighting  and reflective surface is a good start to get out of routine.
“Reflective street” (Lumix G85 ISO 100 1/80s -0.7 + 14-140 mm f/3.5-5.6 @ 14 mm f/8) Searching for interesting lighting and reflective surface is a good start to get out of routine.
"Square everywhere" (Nikon D750 ISO 800 1/180s + 24-120 mm f/4 @ 120 mm f/4.8) Step by step you should switch from funny street snapshot to more personal subject and sophisticated composition
“Square everywhere” (Nikon D750 ISO 800 1/180s + 24-120 mm f/4 @ 120 mm f/4.8) Step by step you should switch from funny street snapshot to more personal subject and sophisticated composition

Developing a vision

Once you are used to get good results, you have to challenge yourself a little more to add meanings, drama, sparks or personality to your shots.
How to get this?
While pressing the shutter button, you should already get a clear concept in mind, a vision or a directive line to be able to bring together a meaningful series of shots to tell a complete story (journalistic approach) or to express a specific mood (“artistic” approach).

"Quiet Butterfly" (Lumix G85 ISO 200 1/400s + 14-140 mm f/3.5-5.6 @ 140 mm f/5.6) ... While others needs quicker reaction before they are gone...
“Quiet Butterfly” (Lumix G85 ISO 200 1/400s + 14-140 mm f/3.5-5.6 @ 140 mm f/5.6) … While others needs quicker reaction before they are gone…
"Lion Cloud". (Nikon D750 ISO 100 1/80s +28 mm f/3.5 @ f/8) Some subjects allow several minutes to be detected and shot... Nikon D750 ISO 100 1/80s +28 mm f/3.5 @ f/8
“Lion Cloud”. (Nikon D750 ISO 100 1/80s +28 mm f/3.5 @ f/8) Some subjects allow several minutes to be detected and shot…

Fine tuning
This conceptual mind will also, later on, help you to process your image on computer in the right direction , the one you had initially chosen.

"Followed by her shadow" (Lumix G85 ISO 100 1/200s + 14-140 mm f/3.5-5.6 @ 14 mm f/6.7) Under such a hard source of light, he choice was obvious here, composing the shot with the subject and her shadow for a more 3D visual.
“Followed by her shadow” (Lumix G85 ISO 100 1/200s + 14-140 mm f/3.5-5.6 @ 14 mm f/6.7) Under such a hard source of light, he choice was obvious here, composing the shot with the subject and her shadow for a more 3D visual.
"Like a mirror" (Lumix G85 ISO 100 1/200s + 14-140 mm f/3.5-5.6 @ 30 mm f/5.6) My little girl is already a little lady, looking at herself in any reflective surface. I was ready for this one!
“Like a mirror” (Lumix G85 ISO 100 1/200s + 14-140 mm f/3.5-5.6 @ 30 mm f/5.6) My little girl is already a little lady, looking at herself in any reflective surface. I was ready for this one!

Some camera brand (such as Olympus or Fujifilm), with great color science, are better than others to delivery very satisfying results out of the box (jpg file), but most of the time, you will be able to improve the result by working on raw files.
All depends on the final use of the picture, such as quick share on social network (jpg are enough) or print for exhibition (better to go raw).

"Electric Birds 2" (Lumix G85 ISO 200 1/1320s + 14-140 mm f/3.5-5.6 @ 14 mm f/6.7). This approach brings in more imagination but also challenge the original concept behind any creative choice,
“Electric Birds 2” (Lumix G85 ISO 200 1/1320s + 14-140 mm f/3.5-5.6 @ 14 mm f/6.7). This approach brings in more options and feed imagination but also challenge the original concept behind any creative choice. It is important to never go “too far” and the limit is a personal choice.
"Electric Birds" (Lumix G85 ISO 200 1/160s + 14-140 mm f/3.5-5.6 @ 102 mm f/6.3). The exact same subject can be shot with so many different point of view and post treatment. This approach brings in more imagination but also challenge the original concept behind any creative choice,
“Electric Birds” (Lumix G85 ISO 200 1/160s + 14-140 mm f/3.5-5.6 @ 102 mm f/6.3). The exact same subject can be shot with so many different point of view and post treatment, such as vintage look or dramatic B&W.

No faking here!

" Electric Birds 3" (Lumix G85 ISO 200 1/400s + 14-140 mm f/3.5-5.6 @ 140 mm f/6.3) Later in the day, when the sky is all blue and the source of light is not behind the subject anymore, best is to keep it in color.
“Electric Birds 3” (Lumix G85 ISO 200 1/400s + 14-140 mm f/3.5-5.6 @ 140 mm f/6.3) Later in the day, when the sky is all blue and the source of light is not behind the subject anymore, best is to keep it in color.

The aim of Post production (“Photoshoping”) is indispensable to extract the optimum “juice” out of your work:
To get back the details you had seen with your eyes that seems gone on the jpg, to reproduce the right colors, to emphasize some parts of the shot or to improve the visibility of important elements by fine tuning the exposure of your raw image.

Post processing extra value

Of course, processing on computer is time consuming, and a potential painful experience for novices, but it is a very useful way to progress and to keep progressing forever.
Processing the image is a way to think of and judge what you had done with each subject, to discover some mistakes or imprecision, some stuff you should had done better or different to get a better result or more options out of the box.

"Cat rest" (Lumix G85 ISO 200 1/1500s + 14-140 mm f/3.5-5.6 @ 177 mm f/6.3) When, the light is great and an interesting subject is there waiting for you to shoot, there is not much things to think about prior to press the trigger.
“Cat rest” (Lumix G85 ISO 200 1/1500s + 14-140 mm f/3.5-5.6 @ 177 mm f/6.3) When, the light is great and an interesting subject is there waiting for you to shoot, there is not much things to think about prior to press the trigger.

Lasting passion

It also helps to emphasize a conceptual approach of photography, the best way to never get bored of it.
I am shooting for a living since 1986 and I am still not tired of it.

"Pollen Hunt" (Lumix GM5 ISO200 1/1600s + 150mm f/2.8 @ f/4) Lens choice matters more on some specific subject needing both speed and short minimal focus distance.
“Pollen Hunt” (Lumix GM5 ISO200 1/1600s + 150mm f/2.8 @ f/4) Lens choice matters on some specific subject needing both speed and short minimal focus distance.
"From the Past" (Lumix G85 ISO 100 1/800s + 14-140 mm f/3.5-5.6 @ 140 mm f/8) Longer lenses compress the perspective, extract details from the environment and keep lines straights.
“From the Past” (Lumix G85 ISO 100 1/800s + 14-140 mm f/3.5-5.6 @ 140 mm f/8) Longer lenses compress the perspective, extract details from the environment and keep lines straights.

More I know about photography, more I am excited about it, as I can measure the progress I still have to do to reach fulfillment.

Visual Samples

To illustrate my words, find here a series of personal shots (no job assignment here) with detailed captions on the three parts: essential settings, composition choices and conceptualization.

" Too young for her first ride" (Lumix G85 ISO 200 1/1000s + 14-140 mm f/3.5-5.6 @ 21 mm f/5.6) For most of the lively shots of kids, it is important to quickly find a point of view with the less disturbing background to keep viewer attention to the main action.
” Too young for her first ride” (Lumix G85 ISO 200 1/1000s + 14-140 mm f/3.5-5.6 @ 21 mm f/5.6) For most of the lively shots of kids, it is important to quickly find a point of view with the less disturbing background to keep viewer attention to the main action.
“Blue Crown″ (Lumix G85 ISO 200 1/640s + 14-140 mm f/3.5-5.6 @ 24 mm f/5.6) Color combination is a basic of composition to associate a subject to an interesting background.
“Blue Crown″ (Lumix G85 ISO 200 1/1640s + 14-140 mm f/3.5-5.6 @ 24 mm f/5.6) Color combination is a basic of composition to associate a subject to an interesting background.

I hope that all of this will be useful to my readers.
If you are having questions or if you are in need of explanation, do not hesitate to drop me an email!

Former photo journalist, Film maker and ELC Shanghai Photography teacher, Franc Peret is teaching Essential Photography Classes, Advanced Photography Workshop and Film Making Classes in Shanghai, for the last 11 years.
If you wish to contact Franc, just drop an email to francperet@hotmail.com

Once the essential set up of the camera is done right, most important is to not miss the right moment! Lumix G85  ISO 400 1/40s  + 25mm f/1.4 @ f/1.4
“Ice on lips” (Lumix G85 ISO 400 1/40s + 25mm f/1.4 @ f/1.4) Once the essential set up of the camera is done right, most important is to not miss the moment!
"Lion Cloud". (Nikon D750 ISO 100 1/80s +28 mm f/3.5 @ f/8) Some subjects allow several minutes to be detected and shot... Nikon D750 ISO 100 1/80s +28 mm f/3.5 @ f/8
“Lion Cloud”. (Nikon D750 ISO 100 1/80s +28 mm f/3.5 @ f/8) Some subjects allow several minutes to be detected and shot…
"Followed by her shadow" (Lumix G85 ISO 100 1/200s + 14-140 mm f/3.5-5.6 @ 14 mm f/6.7) Under such a hard source of light, he choice was obvious here, composing the shot with the subject and her shadow for a more 3D visual.
“Followed by her shadow” (Lumix G85 ISO 100 1/200s + 14-140 mm f/3.5-5.6 @ 14 mm f/6.7) Under such a hard source of light, he choice was obvious here, composing the shot with the subject and her shadow for a more 3D visual.
"Electric Birds 2" (Lumix G85 ISO 200 1/1320s + 14-140 mm f/3.5-5.6 @ 14 mm f/6.7). This approach brings in more imagination but also challenge the original concept behind any creative choice,
“Electric Birds 2” (Lumix G85 ISO 200 1/1320s + 14-140 mm f/3.5-5.6 @ 14 mm f/6.7). This approach brings in more options and feed imagination but also challenge the original concept behind any creative choice. It is important to never go “too far” and the limit is a personal choice.
"Electric Birds" (Lumix G85 ISO 200 1/160s + 14-140 mm f/3.5-5.6 @ 102 mm f/6.3). The exact same subject can be shot with so many different point of view and post treatment. This approach brings in more imagination but also challenge the original concept behind any creative choice,
“Electric Birds” (Lumix G85 ISO 200 1/160s + 14-140 mm f/3.5-5.6 @ 102 mm f/6.3). The exact same subject can be shot with so many different point of view and post treatment, such as vintage look or dramatic B&W.
"From the Past" (Lumix G85 ISO 100 1/800s + 14-140 mm f/3.5-5.6 @ 140 mm f/8) Longer lenses compress the perspective, extract details from the environment and keep lines straights.
“From the Past” (Lumix G85 ISO 100 1/800s + 14-140 mm f/3.5-5.6 @ 140 mm f/8) Longer lenses compress the perspective, extract details from the environment and keep lines straights.
"Reflective street"  (Lumix G85 ISO 100 1/80s -0.7 + 14-140 mm f/3.5-5.6 @ 14 mm f/8) Searching for interesting lighting  and reflective surface is a good start to get out of routine.
“Reflective street” (Lumix G85 ISO 100 1/80s -0.7 + 14-140 mm f/3.5-5.6 @ 14 mm f/8) Searching for interesting lighting and reflective surface is a good start to get out of routine.