Tag Archives: Photography Class

SEEING LIGHT

For beginners, a good photography starts with a good subject. While progressing, the quality of light becomes a priority over subject, as any of them can deliver a great result as soon a moody lighting is falling on it.
Franc Peret

In my Essential Photography Classes, I very quickly emphasize the importance of light to my students who solely focus on camera settings and the subject itself.

Commercial photo shoot involves lots of lighting to get the best result out of the subject.
Commercial photo shoot are done in studio to get the best result out of the subject.
TV commercial lighting set up involves much more equipment, time and budget than the shooting part
TV commercial lighting set up involves much more equipment, time and budget than the shooting part.

I am always repeating this back to basic motto: “without good light, there is no good picture”
The word “Photography” literally (from its Greek origin) means: “painting with light”.

Working with light means also working with shadow and everything in between. Nikon D750 ISO100 1/60s with 24-120 mm f/4 @ 90 mm f/11.
My little one looking at the main door bathed by soft natural light. Lumix GM5 ISO200 1/160s with 45 mm f/1.8 @ f/1.8
My little one looking at the main door bathed by soft natural light shaping her face with a bright line. Lumix GM5 ISO200 1/160s with 45 mm f/1.8 @ f/1.8

It is the reason why, big budget advertisement, movies and important visual production are spending most of the money on lighting equipment, specialist and crew.
It is also the reason why studio shooting are making a difference compare to natural light session (for portrait, products and fashion).

Reflective tools under sunlight. Nikon D750 ISO100 1/1000s with 24 mm f/2 @ f/2
Graphical Shanghai airport. Nikon D90 ISO 200 1/60s with 18-140 mmf/3.5-5.6 @  18 mm f/8
Graphical Shanghai airport. Nikon D90 ISO 200 1/60s with 18-140 mmf/3.5-5.6 @ 18 mm f/8

Also, memorable landscape photography are always shot at the best time of the year and the best hours of the day.

ISOgraphy

Of course, with newer camera able to shoot at very high ISO (higher than ISO 6400), this original idea seems outdated.

Meeting new friends. Lumix GM5 ISO1250 1/30s with 25 mm f/1.4 @ f/1.4
Marc the gardener in winter light. Lumix GM5 ISO400 1/15s with 25 mm f/1.4 @ f/1.4

And some geeks are spending their time to challenge their vision and their equipment capacity by shooting subjects in “no light” situation such as a jumping black dog in a tunnel at night.

Apolline, her mother and a stray cat. Lumix GM5 ISO100 1/640s with 25 mm f/1.4 @ f/2
Summer in France. Lumix GM5 ISO100 1/160s with 20 mm f/1.7 @ f/4

With this search of camera efficiency in low light, subject is not important anymore, only pixel peeping and noise hunting on screen seems to bring satisfaction.

Cinemascope framing for this outdoor portrait: During a sunny day, keeping the subject face under shadow deliver a softer and more pleasing look. Nikon D750 ISO100 1/640s with 85 mm f/1.4 @ f/1.4

However, this kind of practice is not related to photography anymore and I am calling it “ISOgraphy”.

Light is all you need

Therefore, whatever camera you are using, a better lighting will always bring the best improvement in your photography.

An old bed frame became a art piece in my garage, before It goes away in a garbage truck. Nikon D750 ISO140  1/160s with 24-120 mm f/4 @ 92 mm f/5
An old bed frame became a art piece in my garage, before It goes away in a garbage truck. Nikon D750 ISO140 1/160s with 24-120 mm f/4 @ 92 mm f/5
A plastic bottle on a table in my home.Thanks to the light, anything can become attractive. Lumix G85 ISO 200 (to preseve details) 1/8s (G85 has a great internal stabilizer) with 100-300 mm f/4-5.6 @ 125mm f/9 (to get enough depth of field)
A plastic bottle on a table in my home.Thanks to the light, anything can become attractive.
Lumix G85 ISO 200 (to preseve details) 1/8s (G85 has a great internal stabilizer) with 100-300 mm f/4-5.6 @ 125mm f/9 (to get enough depth of field)

I am so used to search for light (or building up lighting for film making and studio work) that my emotional response to any subject (even my little daughter) is linked to the quality of light falling on them.

My little one is cute, and even cuter under great lighting, her eyes turned to the sky. Nikon D750 ISO100 1/320s with 90 mm f/2.8 @ f/2.8
My little one is cute, and even cuter under great lighting, her eyes turned to the sky.
Nikon D750 ISO100 1/320s with 90 mm f/2.8 @ f/2.8

Somehow, anything under good lighting is a subject to me and my feeling and creativity is building up the shot.

Quality of light?

When I am speaking about lighting, there is sometime a misunderstanding among my students.
While I am considering quality, they are considering brightness only.

Blowing dandelion seeds... Mid day under blue sky is not offering the best lighting, better to avoid strong shadows on face by choosing your point of view according the sun position. Nikon D5500 ISO100 1/3200s with 50 mm f/1.8 @ f/2
Blowing dandelion seeds… Mid day under blue sky is not offering the best lighting, better to avoid strong shadows on face by choosing your point of view according sun’s position. Nikon D5500 ISO100 1/3200s with 50 mm f/1.8 @ f/2

A good quality of light is shaping the subject (3D feel), bringing a mood (hard or soft), displaying vivid or pastel colors, offering a strong B&W type of contrast or a smooth transition between bright and dark area.

Vintage Suitcase in market. Direct sunlight emphasize colors. details and texture. Nikon D750 ISO200 1/125s with 24-120 mm f/4 @ f/11
On action shot, best is to wait for your subject to cross the light you had detected. Nikon D5500 ISO400 1/1000s with 18-140 mm f/5.6 @ 140 mm f/5.6

As soon as you are starting to be sensitive to light, it is a never ending experience as it is spreading such a wide panel of beauty and there is nothing more enjoyable in life than to see beauty everyday.

Hard light with sharp shadows under winter sunlight. Nikon D750 ISO100 1/3200s with 85 mm f/1.4 @ f/1.8

No need to be trained to find good lighting, it can be anywhere, anytime (for close up shots) and you just need to open your eyes and to concentrate on the way light is falling on things and people around you.
And whatever is bath under a great light will become your subject…

Former photo journalist, Film maker and ELC Shanghai Photography teacher, Franc Peret is teaching Essential Photography Classes, Advanced Photography Workshop and Film Making Classes in Shanghai, for the last 11 years.
If you wish to contact Franc, just drop an email to francperet@hotmail.com

When you are used to see a landscape, it changes drastically according the sky scenario. ISO100 1/2000s with 18-140 mm f/3.5-5.6 @ 18 mm f/5.6
When you are used to see a landscape, it changes drastically according the sky scenario. Nikon D5500 ISO100 1/2000s with 18-140 mm f/3.5-5.6 @ 18 mm f/5.6
Even in a darker area, you need different sources of light  for shaping the scenery. Lumix GM5 ISO400 1/25s with 20 mm f/1.7 @  f/2.8
Even in a darker area, you need different sources of light for shaping the scenery. Lumix GM5 ISO400 1/25s with 20 mm f/1.7 @ f/2.8

MIGRATION

Spring is here, white stork going back home. Picture Shot with Panasonic G85 + Lumix 100-300 mm f/4-f/5.6 lens.
By Franc Peret

Living in Burgundy in France for a while after so many years in China, getting back to nature and wildlife environment is a blessing.
I am always carrying a camera with me to record whatever happens in the countryside.
I am used to driving on a very small road and I spotted an area where migrating birds were used to take a rest.

Full Frame was not the best tool for this shot

That day I was carrying my Nikon D750 and an old 80-200 mm f/2.8 zoom, but the reach was not long enough and anytime I tried to get closer to the bird, they were flying away, in the wrong direction from my point of view.
At home, I am having a 300 mm Nikon lens, but according to my initial shots, I knew it would not be long enough.

M43 for wildlife

The next day, I came back with my Panasonic G85 and my longest lens.
Panasonic or Olympus are M43 type camera and with their smaller sensor (compare to APS-C or Full Frame) actually “crop” the lens internally by 2 compare to Full frame.
Thus, a 100 – 300 mm M43 zoom lens delivers an image which is equivalent to a 200 – 600 mm FF zoom lens.
This is a big advantage for wildlife photography as you can be 2 times further away from your subject + the lens is at least 2 times lighter (less tiring without monopod) than its Full Frame equivalent.
Another advantage is the fact that @ f/4, an M43 sensor delivers the equivalent depth of field @ f/8 on an FF sensor.

Therefore, I am using a lighter (also much cheaper, and surprisingly good) lens, with a long reach and plenty of depth of field.

Last but not least, my Panasonic G85 combines both stabilizations on the sensor and the lens to allow the use of slower shutter speed.
This is a great feature if you are shooting something steady.
However, here, as the birds are flapping, I have to shoot at around 1/500s – 1/1000s shutter speed.

Here are my settings:

– Aperture priority mode
– Continuous focus
– ISO 100: I should put ISO 200 (which the base ISO on this camera) but I was shooting something steady just before this one and I had no time to switch.

Spotting the stork
Spotting the stork

Higher ISO would give me a little bit more speed or allow me to close down a bit more the Aperture for more sharpness and less motion blur.
– Aperture f/5.6: Zoom was at 276 mm and its max aperture at this range is f/5. It is very important on such a zoom lens to never zoom in completely as image get less sharp at the longer end of the zoom.
Also better to never work at its max Aperture. Closing a little bit will always deliver a sharper image.
– Resulting Shutter speed: 1/640s. 1/1000s would have been better and ISO200 would have help on this.
Still, that speed was ok. Actually bigger the bird, less shutter speed you need as they are flapping at a slower frequency than smaller birds.
– Exposure correction: +0.7.
Another great feature of the M43 camera is their electronic viewfinder with histogram constantly visible in it.
Thus, on this Panasonic G85, I can immediately correct under or overexposure by turning a wheel under my thumb without pressing any button. This is immediate and very useful when “magic finger” is not possible (like in this case).
As I am shooting against the sky, close to the source fo light, I had to force my camera to shoot a brighter image to not get the bird as a silhouette.
– Post processing: Some people like (and promote the idea) to correct this kind of exposure compensation in post processing (by pushing brightness in shadows), but M43 sensors have their limit (weakness) and this is one of them.
Correcting too much in post create lots of noise.

As I am “old school” I am used to set my camera at the exact right exposure while shooting as with slides, they were no way to correct mistakes later on.

Hope this was informative!

Former photo journalist, Film maker and ELC Shanghai Photography teacher, Franc Peret is teaching Essential Photography Classes, Advanced Photography Workshop and Film Making Classes in Shanghai, for the last 13 years.
If you wish to contact Franc, just drop an email to francperet@hotmail.com

Friends Holding branches

Winter is the perfect season to shoot trees against the sky, as a graphical and structural silhouette. You just need to find the right subject and the right setting.
By Franc Peret

This picture was shot in Burgundy, at the end of the day with a Sony A7M2 + adapter + 25 years old Nikon AIS 20 mm f/2.8 (Manual focus).
As usual in outdoor shots, I set my camera in Aperture priority mode and pointed it toward the subject without any exposure compensation (+/- @ 0).

Note:
Often I am having questions about sunset shot settings…
Answer: Just point and shoot and deal with the foreground as a silhouette.

1 – COMPOSITION
The idea was to fill up the frame with the branches net complexity and pattern of those trees while getting the sun partially hidden behind one of them. I adjusted my position accordingly to be at the right distance to get the complete scene and avoiding disturbing elements.

2 – CAMERA SET UP
– ISO 100:
Best quality and facing the sun with the right exposure of the sky, shutter speed is always fast enough.

– Aperture: f/8.
I a closing the aperture a lot, even I do not need that much depth of field for 3 reasons: 1 – interesting trees are on the same line (same distance from me). 2 – I am using a very wide lens and wider the lens, deeper is the depth of field by default. 3 – I am far from the trees (about 20 meters) and focusing away already deliver more depth of field. Somehow, at f/4 I would have enough DOF.
However, I closed down much more my aperture to get the best sharpness possible on the complete frame (corner to corner) out of my lens and this happens around f/8 or f/11 (for that generation of lenses).
More modern lenses are able to deliver full-frame sharpness earlier, but diffraction tends to come earlier too.
Never take the risk, shot this type of picture with a different aperture (f/5.6 – f/8 – f/11.) if you are not sure of the best one on the field.

– Related shutter speed: 1/160s.
As soon as there is no wind and you are stable, 1/30s would have been enough if the sun was lower because nothing is moving and I am using a wide lens (which tends less transmitting my potential move to the picture).

Former photo journalist, Film maker and ELC Shanghai Photography teacher, Franc Peret is teaching Essential Photography Classes, Advanced Photography Workshop and Film Making Classes in Shanghai, for the last 13 years.
If you wish to contact Franc, just drop an email to francperet@hotmail.com

Living the flood

Same topic, three ways of shooting it. Pictures, settings, and choices explained.

By Franc Peret

I am not sure my little one, Apolline, will keep those moments in her inner memories, but pictures should help…

All shot with Nikon D750 and Nikon 24-70 mm f/2.8

Shouting Apolline
Shouting Apolline

1 – Shouting Apolline (against heavy clouds ready to pour):
– Zoom lens position 38 mm = Semi-wide shot to integrate the subject in her environment but keeping the possibility to get a shallower depth of field (wider the lens more depth of field you get).
– ISO 100 = Best quality and no need to increase as light are great.
– Aperture: f/2.8 = Treated as a portrait to get a shallow depth of field,
– Resulting Shutter speed (as I am working on Aperture priority mode) = 1/1250s

Feet in Water
Feet in Water

2 – Feet in the water (cut out the rest of the world)
– Zoom lens position 24 mm = Wide shot to integrate the subject in her environment.
– ISO 100 = Best quality and no need to increase as light are great.
– Aperture: f/5.6 = Treated as a landscape shot to get a deep depth of field, as my girl is too small and too far away to be dealt as a portrait. And the location is more important here to tell the story: wet and isolated, cut out from the rest of the world.
– Resulting Shutter speed (as I am working on Aperture priority mode) = 1/350s (I could set up at f/8 but as I never know if Apolline is going to move, I preferred to play it safe. At f/8 shutter speed would be around 1/160s, sufficient if she is keeping steady.)

Under the sun
Under the sun

3 – Under the sun (between rain)
– Zoom lens position 29 mm = Wide shot to integrate the subject in her environment.
– ISO 100 = Best quality and no need to increase as light are great.
– Aperture: f/2.8 = Treated as a portrait to get a shallow depth of field,
– Resulting Shutter speed (as I am working on Aperture priority mode) = 1/1600s (faster than the first shot as there is more light from the sun).

Former photo journalist, Film maker and ELC Shanghai Photography teacher, Franc Peret is teaching Essential Photography Classes, Advanced Photography Workshop and Film Making Classes in Shanghai, for the last 13 years.
If you wish to contact Franc, just drop an email to francperet@hotmail.com

Shooting Fireworks

Here are the 10 most asked question for shooting fireworks, and I am answering to all of them!
By Franc Peret

During my Essential Photography course, which duration is only 25 hours, I cannot cover every aspect of photography in detail.

Light and Colors
However, anytime, I am having specific question from a student, I do take the time to explain the in and out of any special use of the camera.

Nikon D750  = Manual Mode  =  ISO400 1/3s -0.3 EV with 35 mm f/1.4 @ f/5.6
Nikon D750 = Manual Mode = ISO400 1/3s -0.3 EV with 35 mm f/1.4 @ f/5.6
Panasonic GM5 = Manual Mode = ISO200 0.6 s + 25 mm f/1.4 @ f/2.5

One of the topic that often come to the discussion is firework. And it is easy to understand its attraction to photography students.

3 Good reasons to give it a try
First, for a person dedicated to light and colors, a firework show is just magnificent to watch.
Second, This is happening at night, when most of the time people do not take their camera out and this is a very special experience to try.
Third, this subject seems very challenging to shoot as the illumination, which is hard to anticipate, does not last long.
Overall, there is plenty of reasons to give it a try for a photographer, but how to make it a successful experience?
Here are the most often asked question, answered with my tips and the way I am dealing with this subject.

Panasonic GM5 = Manual Mode = ISO200 01/4s +0.3EV + 25 mm f/1.4 @ f/1.6
Panasonic GM5 = Manual Mode = ISO200 0.8 s - 0.3EV + 25 mm f/1.4 @ f/9
Panasonic GM5 = Manual Mode = ISO200 0.8 s – 0.3EV + 25 mm f/1.4 @ f/9

1 – Do I need a tripod?
Yes and no. Tripod can be useful if you are shooting the firework AND the environment (such as a enlighten city landscape). Then, it is important to keep the camera steady as you want to get the background sharp as well.
However, if the main source of light of the location is the firework itself, you can shoot handheld, even with a long pose, as the explosion behave like a flash and the environment is going to be light up only a very short fraction of second and not during your complete shutter time.

2 – Do I need to shoot in manual mode?
If you get a bright background, It is possible to shoot in semi-auto mode (Aperture priority) with some exposure compensation to force the image to get darker(such as -2 or so), however I personally use manual mode, playing around the Aperture and the shutter speed to grab all the color of the firework and to create some special effect with long pause.

Panasonic GM5 = Manual Mode = ISO200 0.6s + 25 mm f/1.4 @ f/7.1
Panasonic GM5 = Manual Mode = ISO200 1.3s + 25 mm f/1.4 @ f/9

3 – Do I need a fast lens?
You do not need a lens with a big Aperture (such as f/1.8 or so) as you are shooting a very bright source of light and by using a wide Aperture, you will take the risk to overexpose the image and therefore, you will get no colors to see. Most of the time, my lens is set to f/4 or f/8 which is a good news as any average zoom will get that Aperture.

4 – Do I need a fast Shutter speed?
All depends what you want to achieve, Get a very sharp view of the explosion or to give time to the fire and colors to spread around to fill up more of the sky. Best is to constantly play around with shutter speed from 1/30s to more than 3s.

Nikon D750 = Manual Mode = ISO200 1/5s -0.3 EV with 35 mm f/1.4 @ f/8

5 – Do I need to increase the ISO a lot?
Best is to keep the ISO low as raising it will bring more noise to the shot, especially in the dark part of the shot (the sky). Also, a higher ISO means less details, less dynamic range and less colors. I usually try to stay as low as ISO 200 or ISO 800.

6 – Do I need to be perfectly stable?
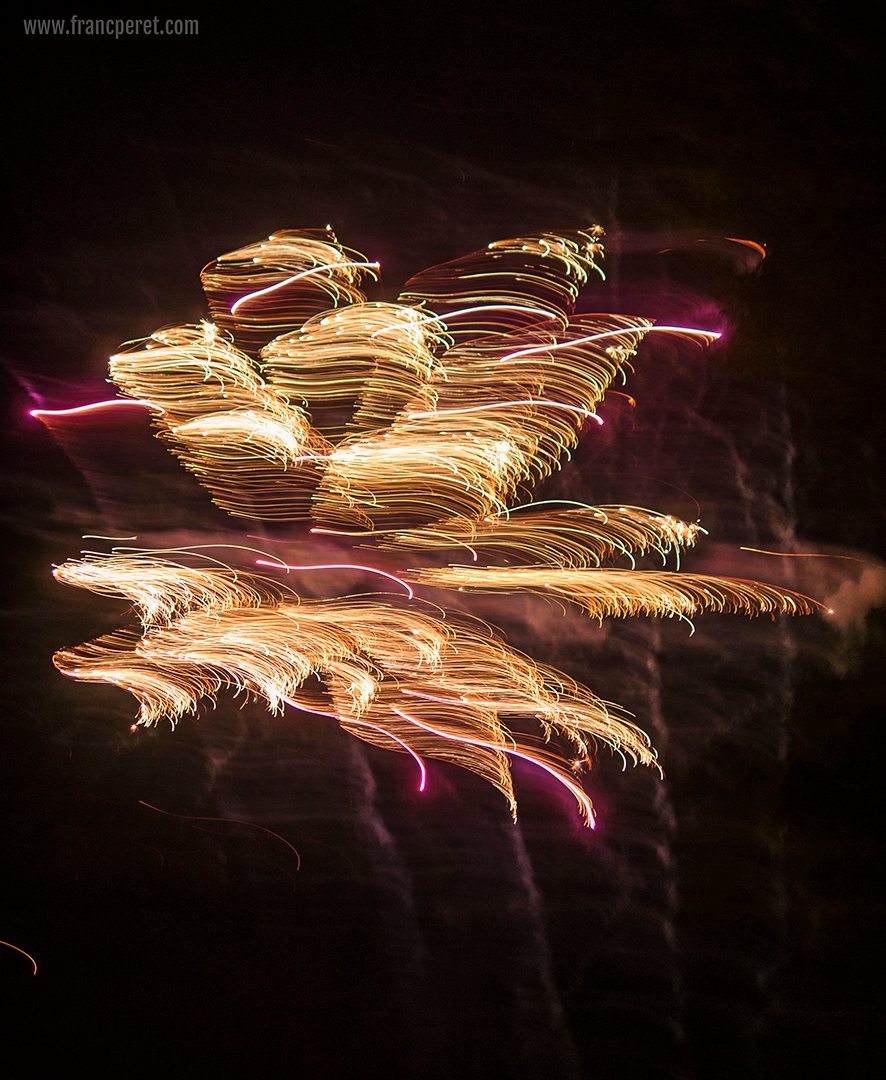
No, as firework is a very good subject to paint with light and by combining a long shutter pause with some camera shake, you can achieve very subliminal results.

Panasonic GM5 = Manual Mode = ISO200 1/5s + 25 mm f/1.4 @ f/1.6
Panasonic GM5 = Manual Mode = ISO200 1/4s + 25 mm f/1.4 @ f/1.6

7 – What lens should I use?
Best is to start with your usual zoom as one problem with firework is to know where exactly things are going to happen. By starting with the wide side of the zoom, you get more chance to grab the show and after you are more confident to guess where the following blow of light will occur, you can zoom in more and more to get some interesting close up.

8 – Should I use manual focus or auto-focus?
You cannot rely on your auto-focus if you point your camera straight to the sky as there is nothing to focus on.
Best, is to pick up something as near as possible to the explosion (such as a tree or a building) and to preset your focus there with auto-focus. You can lock this by half-pressing the shutter button while waiting for the explosion or you can switch your camera to manual mode.

Panasonic GM5 = Manual Mode = ISO200 1/2s + 25 mm f/1.4 @ f/2

If you do so, be very sure to NOT turn the focus ring after as your focus point will not be well preset anymore.
Some camera gets a back button you can use to force your camera to focus and lock it as soon as you stop to press this button. This feature can be useful here, as you need to preset your focus and keep it as is.

9 – When should I press the shutter button?
As often as possible, even you are seeing nothing coming yet. When the sound of the firework is coming to your hear or when your eyes are seeing the light, it is almost too late to shoot. You have to be ready, and listen to the starting explosion which is launching the rocket in the sky.
Also, by using a long pause (slow shutter speed), you get much more chance to grab something as your sensor is open to the show for a longer period of time.

Nikon D750 ISO200 1/5s -0.3 EV with 35 mm f/1.4 @ f/5.6

10 – Where should I position myself?
First try to be out of the crowd to not get pushed around. Second, find a higher position to not get other people head, hands or smartphone in your framing. Sometime, it is good to insert some viewers in the shot to give a sense of scale and to create an atmosphere, but for a first experiment, better to keep it simple…

I hope all of this was useful.
If you are having more questions or if you are in need of more explanation, drop me an email.

Former photo journalist, Film maker and ELC Shanghai Photography teacher, Franc Peret is teaching Essential Photography Classes, Advanced Photography Workshop and Film Making Classes in Shanghai, for the last 11 years.
If you wish to contact Franc, just drop an email to francperet@hotmail.com

The 3 Steps of Photography

I am used to divide my Essential Photography course in three steps. First, providing essential technical knowledge. Second, explaining essential composition rules. Last but not least, developing student’s conceptual mind. Here is how it works.
By Franc Peret

Taking successful pictures is both a simple task and a complicated one.
Simple, because the process involved is almost always the same and quit easy to explain and remember, step by step:
1 – Set the right exposure
2 – Focus on the subject.
3 – Be ready to grab the right moment (positioning or facial expression for example)
4 – Concentrate on your personal creative decision in term of framing, assembling elements (composition), and depth of field.

"Yammi"  (Lumix G85 ISO 100 1/100s + 14-140 mm f/3.5-5.6 @ 17 mm f/4.5) Being patient and steady while waiting for the right moment to shoot help to become discreet and out of focus of the subject, even you are next to her.
“Yammi” (Lumix G85 ISO 100 1/100s + 14-140 mm f/3.5-5.6 @ 17 mm f/4.5) Being patient and steady while waiting for the right moment to shoot help to become discreet and out of sight of the subject, even you are next to her.
Once the essential set up of the camera is done right, most important is to not miss the right moment! Lumix G85  ISO 400 1/40s  + 25mm f/1.4 @ f/1.4
“Ice on lips” (Lumix G85 ISO 400 1/40s + 25mm f/1.4 @ f/1.4) Once the essential set up of the camera is done right, most important is to not miss the moment!

Not that simple

The fact that you often have to solve those 4 steps in less than a second is the complicated part of photography.
Getting the picture right, as often as possible, is possible with training…
More you are going to shoot, better the chance to make the right decision on time.

"Reflective street"  (Lumix G85 ISO 100 1/80s -0.7 + 14-140 mm f/3.5-5.6 @ 14 mm f/8) Searching for interesting lighting  and reflective surface is a good start to get out of routine.
“Reflective street” (Lumix G85 ISO 100 1/80s -0.7 + 14-140 mm f/3.5-5.6 @ 14 mm f/8) Searching for interesting lighting and reflective surface is a good start to get out of routine.
"Square everywhere" (Nikon D750 ISO 800 1/180s + 24-120 mm f/4 @ 120 mm f/4.8) Step by step you should switch from funny street snapshot to more personal subject and sophisticated composition
“Square everywhere” (Nikon D750 ISO 800 1/180s + 24-120 mm f/4 @ 120 mm f/4.8) Step by step you should switch from funny street snapshot to more personal subject and sophisticated composition

Developing a vision

Once you are used to get good results, you have to challenge yourself a little more to add meanings, drama, sparks or personality to your shots.
How to get this?
While pressing the shutter button, you should already get a clear concept in mind, a vision or a directive line to be able to bring together a meaningful series of shots to tell a complete story (journalistic approach) or to express a specific mood (“artistic” approach).

"Quiet Butterfly" (Lumix G85 ISO 200 1/400s + 14-140 mm f/3.5-5.6 @ 140 mm f/5.6) ... While others needs quicker reaction before they are gone...
“Quiet Butterfly” (Lumix G85 ISO 200 1/400s + 14-140 mm f/3.5-5.6 @ 140 mm f/5.6) … While others needs quicker reaction before they are gone…
"Lion Cloud". (Nikon D750 ISO 100 1/80s +28 mm f/3.5 @ f/8) Some subjects allow several minutes to be detected and shot... Nikon D750 ISO 100 1/80s +28 mm f/3.5 @ f/8
“Lion Cloud”. (Nikon D750 ISO 100 1/80s +28 mm f/3.5 @ f/8) Some subjects allow several minutes to be detected and shot…

Fine tuning
This conceptual mind will also, later on, help you to process your image on computer in the right direction , the one you had initially chosen.

"Followed by her shadow" (Lumix G85 ISO 100 1/200s + 14-140 mm f/3.5-5.6 @ 14 mm f/6.7) Under such a hard source of light, he choice was obvious here, composing the shot with the subject and her shadow for a more 3D visual.
“Followed by her shadow” (Lumix G85 ISO 100 1/200s + 14-140 mm f/3.5-5.6 @ 14 mm f/6.7) Under such a hard source of light, he choice was obvious here, composing the shot with the subject and her shadow for a more 3D visual.
"Like a mirror" (Lumix G85 ISO 100 1/200s + 14-140 mm f/3.5-5.6 @ 30 mm f/5.6) My little girl is already a little lady, looking at herself in any reflective surface. I was ready for this one!
“Like a mirror” (Lumix G85 ISO 100 1/200s + 14-140 mm f/3.5-5.6 @ 30 mm f/5.6) My little girl is already a little lady, looking at herself in any reflective surface. I was ready for this one!

Some camera brand (such as Olympus or Fujifilm), with great color science, are better than others to delivery very satisfying results out of the box (jpg file), but most of the time, you will be able to improve the result by working on raw files.
All depends on the final use of the picture, such as quick share on social network (jpg are enough) or print for exhibition (better to go raw).

"Electric Birds 2" (Lumix G85 ISO 200 1/1320s + 14-140 mm f/3.5-5.6 @ 14 mm f/6.7). This approach brings in more imagination but also challenge the original concept behind any creative choice,
“Electric Birds 2” (Lumix G85 ISO 200 1/1320s + 14-140 mm f/3.5-5.6 @ 14 mm f/6.7). This approach brings in more options and feed imagination but also challenge the original concept behind any creative choice. It is important to never go “too far” and the limit is a personal choice.
"Electric Birds" (Lumix G85 ISO 200 1/160s + 14-140 mm f/3.5-5.6 @ 102 mm f/6.3). The exact same subject can be shot with so many different point of view and post treatment. This approach brings in more imagination but also challenge the original concept behind any creative choice,
“Electric Birds” (Lumix G85 ISO 200 1/160s + 14-140 mm f/3.5-5.6 @ 102 mm f/6.3). The exact same subject can be shot with so many different point of view and post treatment, such as vintage look or dramatic B&W.

No faking here!

" Electric Birds 3" (Lumix G85 ISO 200 1/400s + 14-140 mm f/3.5-5.6 @ 140 mm f/6.3) Later in the day, when the sky is all blue and the source of light is not behind the subject anymore, best is to keep it in color.
“Electric Birds 3” (Lumix G85 ISO 200 1/400s + 14-140 mm f/3.5-5.6 @ 140 mm f/6.3) Later in the day, when the sky is all blue and the source of light is not behind the subject anymore, best is to keep it in color.

The aim of Post production (“Photoshoping”) is indispensable to extract the optimum “juice” out of your work:
To get back the details you had seen with your eyes that seems gone on the jpg, to reproduce the right colors, to emphasize some parts of the shot or to improve the visibility of important elements by fine tuning the exposure of your raw image.

Post processing extra value

Of course, processing on computer is time consuming, and a potential painful experience for novices, but it is a very useful way to progress and to keep progressing forever.
Processing the image is a way to think of and judge what you had done with each subject, to discover some mistakes or imprecision, some stuff you should had done better or different to get a better result or more options out of the box.

"Cat rest" (Lumix G85 ISO 200 1/1500s + 14-140 mm f/3.5-5.6 @ 177 mm f/6.3) When, the light is great and an interesting subject is there waiting for you to shoot, there is not much things to think about prior to press the trigger.
“Cat rest” (Lumix G85 ISO 200 1/1500s + 14-140 mm f/3.5-5.6 @ 177 mm f/6.3) When, the light is great and an interesting subject is there waiting for you to shoot, there is not much things to think about prior to press the trigger.

Lasting passion

It also helps to emphasize a conceptual approach of photography, the best way to never get bored of it.
I am shooting for a living since 1986 and I am still not tired of it.

"Pollen Hunt" (Lumix GM5 ISO200 1/1600s + 150mm f/2.8 @ f/4) Lens choice matters more on some specific subject needing both speed and short minimal focus distance.
“Pollen Hunt” (Lumix GM5 ISO200 1/1600s + 150mm f/2.8 @ f/4) Lens choice matters on some specific subject needing both speed and short minimal focus distance.
"From the Past" (Lumix G85 ISO 100 1/800s + 14-140 mm f/3.5-5.6 @ 140 mm f/8) Longer lenses compress the perspective, extract details from the environment and keep lines straights.
“From the Past” (Lumix G85 ISO 100 1/800s + 14-140 mm f/3.5-5.6 @ 140 mm f/8) Longer lenses compress the perspective, extract details from the environment and keep lines straights.

More I know about photography, more I am excited about it, as I can measure the progress I still have to do to reach fulfillment.

Visual Samples

To illustrate my words, find here a series of personal shots (no job assignment here) with detailed captions on the three parts: essential settings, composition choices and conceptualization.

" Too young for her first ride" (Lumix G85 ISO 200 1/1000s + 14-140 mm f/3.5-5.6 @ 21 mm f/5.6) For most of the lively shots of kids, it is important to quickly find a point of view with the less disturbing background to keep viewer attention to the main action.
” Too young for her first ride” (Lumix G85 ISO 200 1/1000s + 14-140 mm f/3.5-5.6 @ 21 mm f/5.6) For most of the lively shots of kids, it is important to quickly find a point of view with the less disturbing background to keep viewer attention to the main action.
“Blue Crown″ (Lumix G85 ISO 200 1/640s + 14-140 mm f/3.5-5.6 @ 24 mm f/5.6) Color combination is a basic of composition to associate a subject to an interesting background.
“Blue Crown″ (Lumix G85 ISO 200 1/1640s + 14-140 mm f/3.5-5.6 @ 24 mm f/5.6) Color combination is a basic of composition to associate a subject to an interesting background.

I hope that all of this will be useful to my readers.
If you are having questions or if you are in need of explanation, do not hesitate to drop me an email!

Former photo journalist, Film maker and ELC Shanghai Photography teacher, Franc Peret is teaching Essential Photography Classes, Advanced Photography Workshop and Film Making Classes in Shanghai, for the last 11 years.
If you wish to contact Franc, just drop an email to francperet@hotmail.com

Once the essential set up of the camera is done right, most important is to not miss the right moment! Lumix G85  ISO 400 1/40s  + 25mm f/1.4 @ f/1.4
“Ice on lips” (Lumix G85 ISO 400 1/40s + 25mm f/1.4 @ f/1.4) Once the essential set up of the camera is done right, most important is to not miss the moment!
"Lion Cloud". (Nikon D750 ISO 100 1/80s +28 mm f/3.5 @ f/8) Some subjects allow several minutes to be detected and shot... Nikon D750 ISO 100 1/80s +28 mm f/3.5 @ f/8
“Lion Cloud”. (Nikon D750 ISO 100 1/80s +28 mm f/3.5 @ f/8) Some subjects allow several minutes to be detected and shot…
"Followed by her shadow" (Lumix G85 ISO 100 1/200s + 14-140 mm f/3.5-5.6 @ 14 mm f/6.7) Under such a hard source of light, he choice was obvious here, composing the shot with the subject and her shadow for a more 3D visual.
“Followed by her shadow” (Lumix G85 ISO 100 1/200s + 14-140 mm f/3.5-5.6 @ 14 mm f/6.7) Under such a hard source of light, he choice was obvious here, composing the shot with the subject and her shadow for a more 3D visual.
"Electric Birds 2" (Lumix G85 ISO 200 1/1320s + 14-140 mm f/3.5-5.6 @ 14 mm f/6.7). This approach brings in more imagination but also challenge the original concept behind any creative choice,
“Electric Birds 2” (Lumix G85 ISO 200 1/1320s + 14-140 mm f/3.5-5.6 @ 14 mm f/6.7). This approach brings in more options and feed imagination but also challenge the original concept behind any creative choice. It is important to never go “too far” and the limit is a personal choice.
"Electric Birds" (Lumix G85 ISO 200 1/160s + 14-140 mm f/3.5-5.6 @ 102 mm f/6.3). The exact same subject can be shot with so many different point of view and post treatment. This approach brings in more imagination but also challenge the original concept behind any creative choice,
“Electric Birds” (Lumix G85 ISO 200 1/160s + 14-140 mm f/3.5-5.6 @ 102 mm f/6.3). The exact same subject can be shot with so many different point of view and post treatment, such as vintage look or dramatic B&W.
"From the Past" (Lumix G85 ISO 100 1/800s + 14-140 mm f/3.5-5.6 @ 140 mm f/8) Longer lenses compress the perspective, extract details from the environment and keep lines straights.
“From the Past” (Lumix G85 ISO 100 1/800s + 14-140 mm f/3.5-5.6 @ 140 mm f/8) Longer lenses compress the perspective, extract details from the environment and keep lines straights.
"Reflective street"  (Lumix G85 ISO 100 1/80s -0.7 + 14-140 mm f/3.5-5.6 @ 14 mm f/8) Searching for interesting lighting  and reflective surface is a good start to get out of routine.
“Reflective street” (Lumix G85 ISO 100 1/80s -0.7 + 14-140 mm f/3.5-5.6 @ 14 mm f/8) Searching for interesting lighting and reflective surface is a good start to get out of routine.

CINEMATIC PORTRAIT

The concept of this workshop is to turn students into different characters, by building a scene with a certain mood, posture, and situation. Then, we take a shot which looks like a frame extracted from a movie.
By Franc Peret and his Advanced Students

The mood is created by the location, the actor’s position, and facial expression, the props (accessories) but most importantly by the lighting which is a key feature in term of storytelling.

The Serial Killer
“The Serial Killer” / Lighting and scene set up: Franc / Concept: Dean , Franc and Fabrice / Model: Fabrice, Nils and Qiong / Shot: Franc with Sony A7M2 + Nikon AI AUTO 50 mm F/1.4 (old Manual focus lens)

Sometimes complex, sometimes simpler, the set up is dedicated to the story and often involve 4 lights: Key, Kick (or hair), Background and Ambiance (or eyes) light.

"The Serial Killer " Close up.
“The Serial Killer ” Extrem Close up and head chopped off to hide the identity of the madman.
The Serial Killer (Close Up)
“The Serial Killer” (Close Up): 5600K Key light with some red gel + kick light + ambient light + eyes light.

Accessories, if well balanced, can complete the illusion, as well as makeup, costume, and hairstyle.

Flower power... Lighting Set up: Yellow key light, Ambient light with red gel, white kick light.
“Flower power…” Lighting Set up: Yellow key light, Ambient light with red gel, white kick light.

I am used to setting challenging lighting for filmmaking and It is much more interesting to work on this type of project in an average location (Apartment Hotel) than to do modeling or beauty shot in an immaculate and dedicated (and somehow boring) photography studio.

"Nouvelle Vague"
“Nouvelle Vague” Lighting: Franc / Concept and scene set up: Nils, Qiong, Fabrice and Franc /
Model: Fabrice and Nils / Shot: Franc with Sony A7M2 + Nikon AI AUTO 50 mm F/1.4
"Nouvelle Vague" light set up: 2 opposite key lights and a bit of ambient light.
“Nouvelle Vague” light set up: 2 opposite key lights and a bit of ambient light.

None of those pictures would ever exist without the character (acting) and the lighting.
The photographer is the least important part of the equation. None of those shots belong to the person who had pressed the shutter button.

"Lonely Beauty after the party" Lighting Set up and Concept: Franc / Model: Novita / Shot: Monja with Canon 5D IV  and  50 mm f/1.4
“Lonely Beauty after the party” Lighting Set up and Concept: Franc / Model: Novita /
Shot: Monja with Canon 5D IV and 50 mm f/1.4

Forgetting to mention the teamwork in the credit of the photography would be completely dishonest from the photographer.

"Hitchcock film's character" Lighting Set up and Concept: Franc / Model: Monja / Shot: Franc with Panasonic Lumix G85 and Leica 25mm f/1.4
“Hitchcock movie’s character” Lighting Set up and Concept: Franc / Model: Monja /
Shot: Franc with Panasonic Lumix G85 and Leica 25mm f/1.4

Every shot has to be linked to a team of an Art director (concept), actor, Director of photography (light) and Photographer…

"1950's James Bond Girl from the North" Lighting Set up: Franc / Concept and Model: Magdalena / Shot: Franc with Panasonic Lumix G85 and 42.5mm f/1.7
“1950’s James Bond Girl from the North” Lighting Set up: Franc / Concept and Model: Magdalena / Shot through a curtain: Franc with Panasonic Lumix G85 and 42.5mm f/1.7

Filmmaking is a very important addition to anyone Photography experience, as working alone is not helping much personal improvement, while shooting a movie is a teamwork of added values and there is always so much to learn from others…
Franc Peret

MAKING OF SHOTS:

Novita performing in front of Monja, Magdalena and Kerstin.
Monja's concentration through her Canon 5D Mark IV viewfinder. Shot by Franc with a Panasonic G85 and Leica 25mm f/1.4
Monja’s concentration through her Canon 5D Mark IV viewfinder. Shot by Franc with a Panasonic G85 and Leica 25mm f/1.4

Shots with my advanced students: Dean, Fabrice, Nils, Qiong, Matteo, Jonathan, Monja, Kerstin, Novita and Magdalena.

Magdalena pointing her Canon 5D MarkIV  toward a 1920's character performed by Kerstin. Lighting and Concept: Franc / Model: Kerstin / Shot by Franc with a Panasonic G85 and a Leica 25mm f/1.4.
Magdalena pointing her Canon 5D MarkIV toward a 1920’s character performed by Kerstin. Lighting and Concept: Franc / Model: Kerstin / Shot by Franc with a Panasonic G85 and a Leica 25mm f/1.4.

Former photo journalist, Film maker and ELC Shanghai Photography teacher, Franc Peret is teaching Essential Photography Classes, Advanced Photography Workshop and Film Making Classes in Shanghai, for the last 11 years.
If you wish to contact Franc, just drop an email to francperet@hotmail.com

New Awards

By expressing their satisfaction through their testimonial, my formner students are delivering the best award I can dream of.

By Franc Péret

When I created the content of my Photography Course, 12 years ago, I had a very personal (and genuine) concept in mind.
I have no need to explain it to you as my students are explaining it very clearly through their testimonial.

The class is a creative melting pot: Students are from allover the world sharing different experiences and point of view.
The Class is a creative melting pot: Students are from allover the world sharing different experiences and point of view.

Those comments represents a double happiness to me:
– My students enjoyed the experience and their satisfaction is my first reward.
– Second, Their in depth description of the specificity of the Course perfectly match my original concept.
The way I am transmitting my knowledge is well understood by all of my students, despite their wide range of origins, personality and experience.

Discovering new points of interest is also promoted for freeing imagination.
During the course, students are welcome to try new tricks to answer their needs

This means, I designed the right course for the right people and this is the main reason of its lasting popularity and success.
To understand more about the mood and the content of the course, check this series of recent testimonials:

After the course, students are seeing things that they had never notice before.
After the Course, students are seeing things that they had never notice before.

1 – Chiara (Italy)
“Franc’s fun and approachable style makes even a rookie photographer feel comfortable and motivated. He breaks all the concepts down into easy to digest and to apply notions, using clear examples to explain himself. He really puts his students first, in the classroom and during photo walks. Your understanding is his main priority. The end of the course feels like just the beginning of a relationship with Franc and fellow students.”

Dean in full action.

2 – Dean (UK)
“Eyes wide open!
The day of my first class I had to clean the dust off my camera! 10 weeks later after doing Franc’s beginner course, my camera is now firmly by my side.
Franc has an amazing talent to condense so much knowledge and experience into a short course, in an entertaining way. He cleverly pitched the lessons to everyone’s needs by always making the content personal and relevant to our own interests.
He inspired me to open my eyes and notice beauty in even the smallest of subjects. During our photography walk, we visited a street I’ve quickly walked past hundreds of times without really “seeing”. Franc helped me to rediscover this amazing city from a new perspective!
Friends and family have noticed a massive improvement in my shots, thanks to Franc’s expertise and advice! I know how to create better shots and if something goes wrong, or it doesn’t turn out right, I know how to fix it!
Looking ahead to the advanced classes!”

3 – Fabrice (France)
“A few months ago, I decided to join a photography class because I had this DSLR camera I had bought myself and I had no clue what to do with it. My pics looked as “good” as with my iPhone. Today, I’m so glad I took this course: I finally understood what a camera can (and cannot do), what most of the buttons and settings are & the basics of different types of photography. I’m glad I joined Franc’s classes: he demystifies a lot about photography, keeps the lessons very practical, gives plenty of useful tips you can use right away and make a difference. He also makes the classes lively and fun. I can’t wait to join the Advanced Classes next time he is in Shanghai. Thanks Franc!!”

Night shooting with my students to learn the magic of painting with light.
whatever topic students want to hear of will be discussed in class, such as long pose photography
whatever topic students want to hear of will be discussed in Class, such as long pose photography

4 – Jonathan (UK)
“If you want to learn more about photography, then I would highly recommend this course! I can honestly say that I enjoyed every session and I learnt a huge amount about all aspects of photography. Franc is extremely knowledgeable, friendly and has a good sense of humor! He delivers a course that is well explained and easy to follow – there are no stupid questions! Classes sizes are small so if you need help you get it quickly. The photography walks are fun and you learn a lot. I look forward to doing the advanced class!!”

5 – Amelia (China)
“ Franc makes photography FUN. His charming personality and quick wit makes every class always a joy. During the course, I learnt photography 101 – in a way that was simple and digestible for somebody who is really quite horrid at numbers ( still trying to wrap my head around the shutter speed/aptitude/IOS… ). Another highlight : Franc gave me a new perspective on looking at the world. Painting with light – one of my key takeaway! Cameras show you a world that’s invisible to the naked eye. I am thankful to Franc for giving me the tools to use the lens and see the magic. Yay! Thank you!!!! “

6 – Anna (Italy)
I wanted to thank you because your classes were brilliant (your jokes as well) and I feel much more confident now with my camera. Still a long way to go but if I have one tenth of your passion I can only improve from there.
I hope we can be in touch and I can bother you in the future for questions and tips. Keep me posted regarding your future projects.

Shanghai is a great place for street photography, an enjoyable activity with a small group.

7 – Lucica (Romania)
“It’s difficult to express my appreciation for everything I learned from you through words…
I start my class with Franc without knowing anything about photography, but after two months of enjoyable time I learned how to make my memories unforgettable.
Franc taught me how to use my camera and made me want to be a better photographer.
Thanks for everything, Franc!”

Night shooting with Nils and his classmate to learn the magic of painting with light.

8 – Nils (Germany)
I wanted to get into photography for a long time but so far have been held back by the cost of a real camera and the unavailability of suitable photo classes. However, this year I decided to make the first step with Franc’s photography class for beginners and it was definitely the right decision.
Not knowing what I was getting into, I was concerned that the photography class would be very theoretical and dry and similar to how engineering classes used to be in college You can imagine how delighted I was when I found out that Franc’s class is quite the opposite. His teaching style is very hands-on and mostly based on experience which makes it easy for someone who is new to the topic to follow and understand.
Franc himself learned most of his photo skill by practicing and many years of professional and personal experience which means that he understands the point of view of a beginner. Of course it is important to understand the basic theoretical foundation of photography and Franc is able to explain the different variables and settings with clear examples and easy concepts. Also part of the class are photo walk sessions in which you and your group go out into the streets of Shanghai to try out all things you’ve learned in class.
These sessions are guided by Franc and he will show you his way of taking pictures but it is also highly encouraged to be a rebel and find your own way. These walks as well as your personal picture taking will give you many ideas and questions which you can bring back to the class room to discuss them with Franc and your group. This way is an open and relaxed exchange of ideas and a fun way to learn a new hobby. Franc is really passionate about photography and if you are interested in this topic, you soon will feel the passion too.
My only complaint is that I wished the class would go on longer since I still have many questions and many things to learn.
I really want the thank you Franc. Your photography class was so much fun and I made cool new friends that are also interested in the topic. I feel like I have learned a lot and now I have the urge to go outside and take pictures whenever possible. Walking through the streets or travelling through China, I often see things which I want to capture in a picture. It is like I have a different view to whats happening around me. Unfortunately I don’t have my camera with me all the time and often the picture looks different than what I had in my mind, but I want to keep on practicing to get better. I really don’t have any complaints about you or the class but I just wish I had more time and ease to explore everything about photography.”

9 – Miranda (Nederland)
“I did Franc’s Essential Photography class. Franc is a wonderfull and kind teacher. He has humor, which is pleasant, especially during the technical part of the course. I’m amazed by his dedication. After the classes are finished, students can still ask questions or share their work to get feedback. We stay in touch to learn more about photography every day. I’m thankfull for being part of this nice class and getting to know Franc and my fellow students. I’m definately going to attend the advanced photography class.”

10 – Laurence (France)
“It was a real pleasure to attend Franc’s classes. I learnt a lot in a short period of time. Franc manages to create a focused yet fun and pleasant atmosphere that makes me want to come back. I definitely recommend!”

11 – Simone (Germany)
Oh Franc…you are THE ONE AND ONLY…I really enjoyed your course…I learned a lot and now I learn to handle my new camera and want to realize all your tips and tricks that I’m prepared for your next course in October”

Advanced or Essential?

Which course to choose? Advanced or Essential class?
I am often receiving this question when time comes to enroll to one of my photography program. Here is the answer.
Franc Peret

I am offering 2 different Photography courses: Advanced and Essential and despite the detailed description on my website, it can be difficult to choose.

Essential vs Advanced

To make it simple, the Essential Class is what it is: “Essential”.
Everything you should know, think about and do, to get better pictures, a higher success rate (to capture the moment) and very pleasing result (technically and artistically).

Everyone should consider Essential

This class is the best value for money as everything you are learning there will be immediately useful in any kind of situation you can meet daily in the street, during an event or a trip. It covers essential photography in portrait, landscape, sports, macro, night shooting… analyzing the difficulties in those practice and offering a very efficient and practical “what to do” case by case solution.
It is a down to earth class adapted to both complete beginners and people with experience who knows things here or there but who cannot yet connect everything in a logical understanding and order.

Experimental and conceptual

The Advanced class is something very different.
This program is a series of workshops for you to discover how far you can go with your camera.
Also, more important, this experience will help you to understand that what is happening (what you organize and set) in front of the lens is finally much more important than the camera itself.

Pushing Boundaries

Somehow it teach you how to become a director/art director/orchestra conductor handling an overall project and not simply a photographer trying to grab a picture.
It is more oriented toward personal creativity, using the camera in many unusual ways: very higher shutter speed, very long pose, shooting several shot from same position, post processing for special effects and so on.

Take it all!

Somehow, to get a complete overview about photography, you should take both lessons, but I would say, the essential class is the most useful one if you are a street photographer type of person, somebody who like to shoot people in documentary style, bringing back travel or family pictures, shoot landscape or products…
If you are more into design, painting, graphic work and virtual world, the advanced class will match as soon as you know how and why to set up your camera or choose a lens.

I hope all of this will be helpful ot pick up the right class for you, but if anything is not clear yet, do not hesitate to contact me!

Former photo journalist, Film maker and ELC Shanghai Photography teacher, Franc Peret is teaching Essential Photography Classes, Advanced Photography Workshop and Film Making Classes in Shanghai, for the last 11 years.
If you wish to contact Franc, just drop an email to francperet@hotmail.com
In the Mood for Thoughts

Another “making of” of a shot for you to learn from my motivations behind my decision making in term of technical set up and creativity. This time Apolline on the Chair, in the mood for thoughts.
By Franc Peret

1 – CAMERA SETTINGS:
Shot under natural light with Panasonic Lumix GM-5 ISO100 1/250s with prime lens Panasonic 25mm f/1.4@ f/1.4

2 – LIGHT:
The source of light is a big window behind the mini model. Shot on early morning (at least for me).

Another shot, same time, another pose. Apolline is turning her face to the opposite side. You can notice that the reflected light is stronger from there.

3 – ACCESSORIES:
As I am shooting against the source of light, I set one white board on both side of the model. The board on her left side is actually bouncing light to the board on her right side which finally light up her face. This board serves my purpose as she actually try to reach it, a move that created her pose.

4 – CAMERA AND LENS:
I am using my favorite tiny camera and a great Panasonic 25mm f/1.4.
On my sensor, this lens offer the same field of view than a 50mm on a full frame camera (or 35mm on a DX/APS-C camera), which means human eyes vision.

5 – ISO:
Light was enough to keep ISO 100 as I was working with a very bright lens. Due to the quietness of the mini model 1/250s was very safe and I could work at 1/125s if I needed to close down the Aperture one stop.

Brainstorming, Apolline on the position as the first shot. ISO100 1/160s with prime Olympus 45mm f/1.8 @ f/2.2.
Another mood for thoughts. Apolline is facing the main source of light this time and still receive the reflectors addition. ISO200 1/320s with zoom Lumix 12-32mm f/3.5-5.6 @ 12mm f/4.

6 – APERTURE:
I open up my Aperture maximum to reduce depth of field, as I wanted to treat this composition as a portrait with thin Depth of field.
I usually do not open that much for close up baby shots as they are always moving and therefore easily leaving the thin “in focus” zone.
For APS-C, I would suggest, at least, f/2.8 – f/4 and for Full frame camera f/4 – f/5.6 for close up and baby portrait to be sure to get both eyes in focus.
As you can see, I set up a safety belt around her body so that she would not fell down from the chair. This belt is limiting her movement, so f/1.4 was an option.
On this shot, her left eyes is not as sharp as her right eyes, where the focus is done. f/2 would have been a safer set up on my camera, but as I pull back, I thought the depth of field would be enough at f/1.4. Remember Depth of field increase with distance to subject.
My little one kept her pose just for this shot so I didn’t have another chance. I usually always do several shots with different Aperture or slight focus change as this is the most critical choice for baby shots without forgetting shutter speed.
But as I explained in the ISO chapter, with the light available and my reflectors, I had room to close down my aperture 1 stop (f/2 instead of f/1.4).

Cool Attitude: I could add a cigarette in her right hand with some smoke going out from her mouth. ISO200 1/250s with zoom Lumix 12-32mm f/3.5-5.6 @ 21mm f/4.7
I called this couple of shot "Fighting Spirit, due to her attitude.Panasonic GM5 ISO200 1/200s with zoom Lumix 12-32mm f/3.5-5.6 @ 12mm f/4.5
I called this couple of shot “Fighting Spirit, due to her attitude.Panasonic GM5 ISO200 1/200s with zoom Lumix 12-32mm f/3.5-5.6 @ 12mm f/4.5

7 – POINT OF VIEW and COMPOSITION
I wanted to be as close as possible to her level as she was turning her head and eyes down. I wanted to grab her facial expression and I lower myself as much as I could to do so.
My limit was the window behind her as I didn’t want it to enter my shot to be too disturbing or to create flares in my lens as the source of light might enter directly into my lens if I sat lower.

Shot under natural light with Panasonic Lumix GM-5 ISO100 1/250s with prime lens Panasonic 25mm f/1.4@ f/1.4
As a reminder I post here the original shot again. Shot with Panasonic Lumix GM-5 ISO100 1/250s with prime lens Panasonic 25mm f/1.4@ f/1.4

8 – POTENTIAL IMPROVEMENT
Does the cropped foot on the right side of the shot is important?
Not at all as this is a snap shot took before it is gone.
It is what I am used to call an emergency shot.
Also, the complete movement and point of attraction of the picture is on the right side of the image.
Apolline who just wake up was still wearing her “sleeping bag” which as not a definite shape and i am sure many viewer didn’t notice the foot on the right side of the shot.
In a word, it is not important…

Former photo journalist, Film maker and ELC Shanghai Photography teacher, Franc Peret is teaching Essential Photography Classes, Advanced Photography Workshop and Film Making Classes in Shanghai, for the last 11 years.
If you wish to contact Franc, just drop an email to francperet@hotmail.com